Continuous Integration and Continuous Deployment (CI/CD) has become the cornerstone of modern software development, with 87% of high-performing DevOps teams deploying code multiple times per day, compared to once per month for low performers. AWS, commanding 32% of the global cloud infrastructure market, provides a comprehensive suite of native CI/CD services that integrate seamlessly with its vast ecosystem, enabling organizations to build robust, scalable deployment pipelines without managing infrastructure.
Manual deployment processes, developers manually building code, operations teams manually deploying to servers, configuration drift across environments, and deployment anxiety every release cycle create bottlenecks that slow feature delivery, introduce human errors, and prevent the rapid iteration modern businesses demand. These pain points compound as applications scale and teams grow, making automated CI/CD pipelines not just beneficial but essential for competitive software delivery.
This comprehensive guide walks you through building a complete CI/CD pipeline on AWS from scratch, covering every component: setting up source control with AWS CodeCommit, configuring automated builds with AWS CodeBuild, deploying applications with AWS CodeDeploy, and orchestrating the entire workflow with AWS CodePipeline. You’ll learn practical implementation with real code examples, including buildspec.yml and appspec.yml configurations, understand AWS service integration patterns, discover security and optimization best practices, and gain troubleshooting strategies for common pipeline issues.
Understanding CI/CD on AWS
What is CI/CD?
Continuous Integration (CI) is the practice of automatically building and testing code every time developers commit changes to version control. Rather than integrating code quarterly or monthly (risking massive merge conflicts and integration issues), CI integrates multiple times daily, catching integration problems early when they’re easiest to fix. Automated tests run on every commit, providing rapid feedback about code quality and preventing broken code from reaching downstream environments.
Continuous Deployment vs. Continuous Delivery: These terms are often conflated but represent different levels of automation. Continuous Delivery automatically builds, tests, and prepares code for production deployment, but it still requires manual approval before production release, introducing human gates for business-critical decisions. Continuous Deployment goes further by automatically deploying every code change that passes automated tests directly to production without human intervention, maximizing deployment frequency while requiring mature testing and monitoring practices.
Benefits for development teams: CI/CD transforms development workflows by providing: Faster feedback loops (developers learn within minutes if commits break tests), Reduced integration risk (small frequent integrations versus large risky merges), Automated quality gates (tests, security scans, compliance checks run automatically), Deployment confidence (repeatable automated processes eliminate human error), and Accelerated feature velocity (remove deployment bottlenecks enabling multiple daily releases).
AWS CI/CD Service Ecosystem
AWS provides comprehensive native services covering the entire CI/CD lifecycle:
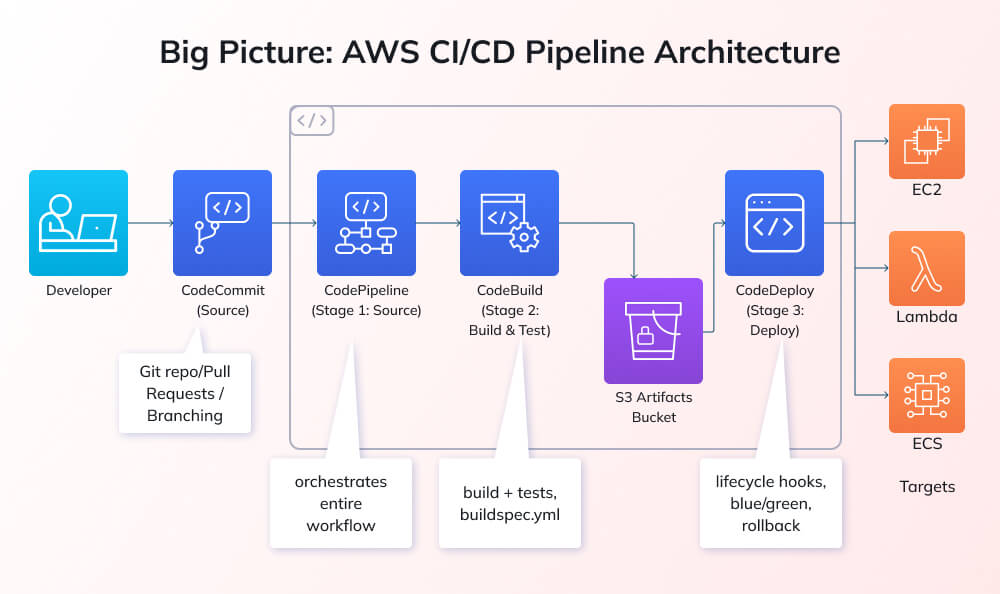
AWS CodePipeline serves as the orchestration engine, the workflow coordinator connecting source control, build, test, and deployment stages into automated pipelines. CodePipeline monitors source repositories for changes, triggers builds when commits occur, promotes artifacts through environments, and provides a visualization of deployment progress across stages.
AWS CodeCommit offers a fully managed, Git-based source control service with private repositories and standard Git functionality, plus AWS integrations. While many teams use GitHub or GitLab, CodeCommit offers native AWS integration, no server management, and automatic scaling, ideal for organizations that prefer AWS-native solutions or require tighter AWS security integration.
AWS CodeBuild provides a fully managed build service, eliminating the need to provision and manage Jenkins or other build servers. CodeBuild compiles code, runs tests, produces deployment artifacts, and scales automatically based on build workload. You define build specifications in buildspec.yml files stored alongside the source code, ensuring build processes are version-controlled alongside the application code.
AWS CodeDeploy automates application deployments to compute resources, EC2 instances, on-premise servers, Lambda functions, or ECS services. CodeDeploy handles deployment orchestration, rolling updates, health checks, and automatic rollback when deployments fail, supporting complex strategies such as blue-green deployments and canary releases.
Integration with third-party tools: While AWS native services provide comprehensive CI/CD capabilities, AWS CodePipeline integrates seamlessly with popular third-party tools, including GitHub/GitLab/Bitbucket for source control, Jenkins for builds, Terraform for infrastructure provisioning, and various testing/security scanning tools. This flexibility lets teams adopt AWS CI/CD incrementally, integrating with existing tools while gradually transitioning to AWS-native services.
PRO TIP: WHEN TO USE AWS NATIVE VS THIRD-PARTY TOOLS Choose AWS native services (CodePipeline, CodeBuild, CodeDeploy) when: You want zero server management (fully managed, automatic scaling), you’re already heavily invested in the AWS ecosystem, you need tight AWS service integration (IAM, CloudWatch, S3), or you want predictable AWS-consolidated billing. AWS native tools excel for teams that want simplicity and tight AWS integration without managing infrastructure. Consider third-party tools (Jenkins, GitHub Actions, GitLab CI) when: you need a specific plugin ecosystem (Jenkins has 1500+ plugins); you have multi-cloud deployments requiring cloud-agnostic pipelines; your team has deep expertise in specific tools; or you need features not yet available in AWS services. Hybrid approaches work well, use GitHub for source control, but CodeBuild/CodeDeploy for AWS-specific deployment tasks. |
Prerequisites and Setup
AWS Account Requirements
IAM permissions needed: Building CI/CD pipelines requires specific IAM permissions across multiple AWS services. At minimum, you need permissions for: CodePipeline (create, update, view), CodeCommit (repository management, pull, push), CodeBuild (project management, start builds), CodeDeploy (application and deployment group management), S3 (artifact storage bucket access), IAM (role creation for service-to-service permissions), and CloudWatch (logging and monitoring access).
For learning environments, use an IAM user with administrator access. For production, follow least privilege principles creating custom IAM policies granting only necessary permissions. AWS provides managed policies like AWSCodePipelineFullAccess, AWSCodeBuildAdminAccess, and AWSCodeDeployFullAccess as starting points, though custom policies provide tighter security.
Service limits and quotas: Be aware of AWS service quotas: CodePipeline allows 300 pipelines per region (soft limit, increasable), CodeBuild supports 60 concurrent builds per region, and CodeCommit permits 1,000 repositories per region. For most projects these limits are generous, but large enterprises should review quotas and request increases proactively.
Development Environment Setup
AWS CLI installation: Install AWS Command Line Interface for programmatic AWS interaction. Download from aws.amazon.com/cli, install for your OS (Windows/Mac/Linux), and configure credentials:
# Install AWS CLI (MacOS/Linux via curl)
curl “https://awscli.amazonaws.com/awscli-exe-linux-x86_64.zip” -o “awscliv2.zip”
unzip awscliv2.zip
sudo ./aws/install
# Configure AWS credentials
aws configure
# Enter: Access Key ID, Secret Access Key, Region (us-east-1), Output format (json)
# Verify installation
aws –version
aws sts get-caller-identity # Confirms authentication
Git configuration: Ensure Git is installed and configured:
# Install Git (if not present)
sudo apt-get install git # Ubuntu/Debian
brew install git # MacOS
# Configure Git identity
git config –global user.name “Your Name”
git config –global user.email “your.email@example.com”
# Verify configuration
git config –list
Sample application preparation: For this tutorial, we’ll use a simple Node.js Express application. Create the project structure:
mkdir my-app && cd my-app
npm init -y
npm install express –save
# Create simple app.js
cat > app.js << ‘EOF’
const express = require(‘express’);
const app = express();
const port = process.env.PORT || 3000;
app.get(‘/’, (req, res) => {
res.send(‘Hello from CI/CD Pipeline v1.0!’);
});
app.get(‘/health’, (req, res) => {
res.status(200).json({ status: ‘healthy’ });
});
app.listen(port, () => {
console.logServer running on port ${port});
});
EOF
# Create package.json start script
npm pkg set scripts.start=”node app.js”
npm pkg set scripts.test=”echo ‘Running tests…’ && exit 0″
AWS Services Setup
Creating S3 bucket for artifacts: CodePipeline stores artifacts (build outputs, deployment packages) in S3 between stages:
# Create S3 bucket (bucket names must be globally unique)
aws s3 mb s3://my-cicd-artifacts-bucket-12345 –region us-east-1
# Enable versioning (recommended for artifact traceability)
aws s3api put-bucket-versioning \
–bucket my-cicd-artifacts-bucket-12345 \
–versioning-configuration Status=Enabled
Setting up IAM roles: AWS services need IAM roles to interact with each other. Create roles for CodePipeline, CodeBuild, and CodeDeploy. These roles grant services permission to access S3 artifacts, invoke other services, and write logs.
Configuring AWS credentials: For local development and testing, configure AWS credentials either through AWS CLI (aws configure) or environment variables. For production pipelines, use IAM roles attached to resources (EC2 instance profiles, ECS task roles) rather than embedding credentials.
Step 1 – Setting Up Source Control with AWS CodeCommit
Creating a CodeCommit Repository
Repository creation via AWS Console:
Navigate to AWS CodeCommit in AWS Console
Click “Create repository”
Enter repository name: my-app-repo
Add description (optional): “Sample app for CI/CD tutorial”
Click “Create”
Repository creation via AWS CLI (recommended for automation):
# Create CodeCommit repository
aws codecommit create-repository \
–repository-name my-app-repo \
–repository-description “Sample application for CI/CD pipeline” \
–region us-east-1
# Output includes cloneUrlHttp and cloneUrlSsh
Cloning and initial commit:
# Clone the empty repository
git clone https://git-codecommit.us-east-1.amazonaws.com/v1/repos/my-app-repo
cd my-app-repo
# Copy your application files into the repository
cp -r ../my-app/* .
# Initial commit
git add .
git commit -m “Initial commit: Node.js Express application”
git push origin main
Configuring Git Credentials
HTTPS Git credentials setup: AWS provides HTTPS Git credentials specifically for CodeCommit:
Navigate to IAM Console → Users → Your User
Security credentials tab → HTTPS Git credentials for AWS CodeCommit
Click “Generate credentials”
Download and save username/password
Use these credentials when Git prompts during push/pull operations
SSH key configuration (alternative to HTTPS):
# Generate SSH key pair
ssh-keygen -t rsa -b 4096 -C “your.email@example.com”
# Save to default location (~/.ssh/id_rsa)
# Display public key
cat ~/.ssh/id_rsa.pub
# Add public key to IAM:
# IAM Console → Users → Your User → Security credentials →
# SSH public keys for AWS CodeCommit → Upload SSH public key
# Configure SSH config file
cat >> ~/.ssh/config << ‘EOF’
Host git-codecommit.*.amazonaws.com
User APKAEIBAERJR2EXAMPLE # Your SSH Key ID from IAM
IdentityFile ~/.ssh/id_rsa
EOF
# Test SSH connection
ssh git-codecommit.us-east-1.amazonaws.com
# Should return: “You have successfully authenticated”
Git credential helper (easiest for MacOS/Linux):
# Configure Git to use AWS CLI credential helper
git config –global credential.helper ‘!aws codecommit credential-helper $@’
git config –global credential.UseHttpPath true
# Now Git operations automatically use your AWS CLI credentials
Repository Best Practices
Branch protection rules: Protect critical branches from direct commits:
# While CodeCommit doesn’t have native branch protection like GitHub,
# use approval rule templates for pull requests
aws codecommit create-approval-rule-template \
–approval-rule-template-name “require-two-approvals” \
–approval-rule-template-description “Require 2 approvals for main branch” \
–approval-rule-template-content ‘{
“Version”: “2018-11-08”,
“DestinationReferences”: [“refs/heads/main”],
“Statements”: [{
“Type”: “Approvers”,
“NumberOfApprovalsNeeded”: 2
}]
}’
Merge request workflows: Use pull requests for code review:
# Create feature branch
git checkout -b feature/new-endpoint
# Make changes, commit
git add .
git commit -m “Add /api/status endpoint”
git push origin feature/new-endpoint
# Create pull request via AWS CLI
aws codecommit create-pull-request \
–title “Add status API endpoint” \
–description “Implements health check endpoint for monitoring” \
–targets repositoryName=my-app-repo,sourceReference=feature/new-endpoint,destinationReference=main
Repository triggers: Configure triggers to notify teams of repository events or trigger external systems (though CodePipeline auto-triggers are usually sufficient for CI/CD).
AVOID THIS MISTAKE: FORGETTING GIT CREDENTIAL CONFIGURATION What happens: You clone the repository successfully but encounter authentication errors when trying to push commits: fatal: Authentication failed for ‘https://git-codecommit…’ Why it’s problematic: CodeCommit requires specific AWS credentials; your standard AWS access keys don’t work directly with Git HTTPS. Without proper credential configuration, you’ll be unable to push code changes, blocking your entire CI/CD workflow from the start. What to do instead: Configure one of three credential methods BEFORE attempting to push:
Test authentication immediately after configuration: git push origin main should succeed without errors. |
Step 2 – Configuring Build with AWS CodeBuild
Creating a CodeBuild Project
Build environment configuration: Create a CodeBuild project defining how builds execute:
# Create CodeBuild project via AWS CLI
aws codebuild create-project \
–name my-app-build \
–source type=CODECOMMIT,location=https://git-codecommit.us-east-1.amazonaws.com/v1/repos/my-app-repo \
–artifacts type=S3,location=my-cicd-artifacts-bucket-12345,packaging=ZIP,name=build-output.zip \
–environment type=LINUX_CONTAINER,image=aws/codebuild/standard:7.0,computeType=BUILD_GENERAL1_SMALL \
–service-role arn:aws:iam::ACCOUNT-ID:role/CodeBuildServiceRole
Docker image selection: CodeBuild uses Docker containers as build environments. AWS provides curated images (aws/codebuild/standard:7.0 includes Node.js, Python, Java, Docker), or use custom Docker images from ECR. Standard 7.0 includes: Node.js 18/20, Python 3.11, Java 17, Docker, Git, AWS CLI.
Compute type selection: Choose based on build requirements:
BUILD_GENERAL1_SMALL: 3 GB memory, 2 vCPUs – $0.005/minute (suitable for small Node.js/Python apps)
BUILD_GENERAL1_MEDIUM: 7 GB memory, 4 vCPUs – $0.01/minute (most common choice)
BUILD_GENERAL1_LARGE: 15 GB memory, 8 vCPUs – $0.02/minute (large Java/C++ projects)
Writing buildspec.yml
The buildspec.yml file defines build commands and must be placed in your repository root:
version: 0.2
# Environment variables for build
env:
variables:
NODE_ENV: “production”
parameter-store:
DB_PASSWORD: /myapp/db/password # Retrieve from Systems Manager Parameter Store
# Build phases
phases:
install:
runtime-versions:
nodejs: 20
commands:
– echo “Installing dependencies…”
– npm install
pre_build:
commands:
– echo “Running pre-build tasks…”
– echo “Build started on date”
– npm run lint # Optional: linting
build:
commands:
– echo “Running build…”
– npm run build # If you have a build script
– echo “Running tests…”
– npm test
post_build:
commands:
– echo “Build completed on date”
– echo “Packaging application…”
# Create deployment package
– mkdir -p deployment
– cp -r node_modules deployment/
– cp package*.json deployment/
– cp app.js deployment/
– cp appspec.yml deployment/
– cp -r scripts deployment/
# Artifacts to pass to next stage
artifacts:
files:
– ‘**/*’
base-directory: deployment
name: my-app-$(date +%Y-%m-%d-%H-%M-%S).zip
# Cache dependencies to speed up subsequent builds
cache:
paths:
– ‘node_modules/**/*’
# Reports for test results (optional)
reports:
test-results:
files:
– ‘test-results.xml’
file-format: ‘JUNITXML’
Build phases explanation:
install: Install runtime versions and dependencies
pre_build: Pre-build validation, linting, environment setup
build: Core build tasks, compilation, testing, asset generation
post_build: Post-build tasks—packaging, artifact creation, cleanup
Environment variables: Define via env.variables (hardcoded), env.parameter-store (Systems Manager Parameter Store for secrets), or env.secrets-manager (Secrets Manager for sensitive data).
Artifacts configuration: Specifies which files CodeBuild uploads to S3 for subsequent pipeline stages. Use base-directory to specify root folder and files to match patterns.
Testing the Build
Manual build execution:
# Trigger manual build
aws codebuild start-build –project-name my-app-build
# Output includes build ID
# Monitor build progress
aws codebuild batch-get-builds –ids
Build logs analysis: View real-time logs in CloudWatch Logs or CodeBuild Console. Look for:
Phase completion status (install, pre_build, build, post_build)
Test results and failures
Artifact upload confirmation
Total build duration
Troubleshooting common issues:
Dependency installation failures: Check network connectivity, verify package.json correctness
Test failures: Review test output in logs, ensure test environment variables are set
Artifact upload errors: Verify S3 bucket permissions, check IAM role attached to CodeBuild
Timeout errors: Increase build timeout setting (default 60 minutes) or optimize build steps
Step 3 – Configuring Deployment with AWS CodeDeploy
Setting Up Deployment Environment
EC2 instance configuration: CodeDeploy requires target instances with the CodeDeploy agent installed:
# Launch EC2 instance (Amazon Linux 2)
# Ensure instance has IAM role with AmazonEC2RoleforAWSCodeDeploy policy
# SSH into the instance and install the CodeDeploy agent
sudo yum update -y
sudo yum install ruby wget -y
# Download and install CodeDeploy agent
cd /home/ec2-user
wget https://aws-codedeploy-us-east-1.s3.us-east-1.amazonaws.com/latest/install
chmod +x ./install
sudo ./install auto
# Verify agent is running
sudo service codedeploy-agent status
# Should show: “The AWS CodeDeploy agent is running”
# Install Node.js (for our sample app)
curl -sL https://rpm.nodesource.com/setup_20.x | sudo bash –
sudo yum install -y nodejs
CodeDeploy agent installation: The agent polls CodeDeploy for deployment instructions, downloads artifacts from S3, and executes deployment scripts specified in appspec.yml.
Creating application and deployment group:
# Create CodeDeploy application
aws deploy create-application \
–application-name my-app \
–compute-platform Server
# Create deployment group (logical grouping of EC2 instances)
aws deploy create-deployment-group \
–application-name my-app \
–deployment-group-name production \
–deployment-config-name CodeDeployDefault.AllAtOnce \
–ec2-tag-filters Key=Name,Value=my-app-server,Type=KEY_AND_VALUE \
–service-role-arn arn:aws:iam::ACCOUNT-ID:role/CodeDeployServiceRole
Deployment groups define which instances receive deployments (via EC2 tags or Auto Scaling groups) and deployment configuration (all-at-once, one-at-a-time, half-at-a-time).
Creating appspec.yml
The appspec.yml file (stored in repository root) defines deployment behavior:
version: 0.0
os: linux
# Files to copy from artifact to instance
files:
– source: /
destination: /home/ec2-user/my-app
# File permissions
permissions:
– object: /home/ec2-user/my-app
owner: ec2-user
group: ec2-user
mode: 755
type:
– directory
– object: /home/ec2-user/my-app/app.js
owner: ec2-user
group: ec2-user
mode: 644
type:
– file
# Deployment lifecycle hooks
hooks:
# Runs before application is stopped
BeforeInstall:
– location: scripts/before_install.sh
timeout: 300
runas: root
# Runs after files are copied
AfterInstall:
– location: scripts/after_install.sh
timeout: 300
runas: ec2-user
# Runs before application starts
ApplicationStart:
– location: scripts/start_server.sh
timeout: 300
runas: ec2-user
# Runs after application starts (health checks)
ValidateService:
– location: scripts/validate_service.sh
timeout: 300
runas: ec2-user
Deployment lifecycle hooks:
ApplicationStop: Stop currently running application
DownloadBundle: CodeDeploy downloads artifact from S3
BeforeInstall: Pre-installation tasks (stop services, backup data)
Install: CodeDeploy copies files per files section
AfterInstall: Post-installation tasks (install dependencies, configure)
ApplicationStart: Start the new application version
ValidateService: Health checks confirming successful deployment
Create deployment scripts referenced in appspec.yml:
# scripts/before_install.sh
#!/bin/bash
echo “Preparing for installation…”
# Stop existing application if running
pm2 stop my-app || true
# Clean up old deployment
rm -rf /home/ec2-user/my-app
# scripts/after_install.sh
#!/bin/bash
echo “Installing dependencies…”
cd /home/ec2-user/my-app
npm install –production
# Install PM2 for process management
npm install -g pm2
# scripts/start_server.sh
#!/bin/bash
echo “Starting application…”
cd /home/ec2-user/my-app
pm2 start app.js –name my-app
pm2 save
# Configure PM2 to start on boot
pm2 startup systemd -u ec2-user –hp /home/ec2-user
# scripts/validate_service.sh
#!/bin/bash
echo “Validating deployment…”
# Wait for application to start
sleep 10
# Check if process is running
if pm2 list | grep -q “my-app”; then
echo “Application is running”
# Test health endpoint
response=$(curl -s -o /dev/null -w “%{http_code}” http://localhost:3000/health)
if [ “$response” = “200” ]; then
echo “Health check passed”
exit 0
else
echo “Health check failed”
exit 1
fi
else
echo “Application failed to start”
exit 1
fi
Make scripts executable: chmod +x scripts/*.sh
Deployment Strategies
In-place deployment: Stops the application on current instances, deploys the new version, and restarts the application. Causes brief downtime but requires no additional infrastructure.
Blue/green deployment: Creates a new set of instances (green), deploys to green, routes traffic from old instances (blue) to green, then terminates blue. Enables zero-downtime deployments and instant rollback but requires double the infrastructure temporarily.
# Create blue/green deployment group
aws deploy create-deployment-group \
–application-name my-app \
–deployment-group-name production-blue-green \
–deployment-style deploymentType=BLUE_GREEN,deploymentOption=WITH_TRAFFIC_CONTROL \
–blue-green-deployment-configuration \
terminateBlueInstancesOnDeploymentSuccess={action=TERMINATE,terminationWaitTimeInMinutes=5},\
deploymentReadyOption={actionOnTimeout=CONTINUE_DEPLOYMENT},\
greenFleetProvisioningOption={action=COPY_AUTO_SCALING_GROUP}
Deployment configuration options:
CodeDeployDefault.AllAtOnce: Deploy to all instances simultaneously (fastest, most risk)
CodeDeployDefault.OneAtATime: Deploy to one instance at a time (slowest, least risk)
CodeDeployDefault.HalfAtATime: Deploy to 50% of instances at a time (balance)
Step 4 – Creating the Complete Pipeline with AWS CodePipeline
Pipeline Creation
AWS Console approach:
Navigate to CodePipeline → Create pipeline
Pipeline name: my-app-pipeline
Service role: Create new role (auto-generates necessary permissions)
Artifact store: Choose the S3 bucket created earlier
Click “Next”
Source stage configuration:
Source provider: AWS CodeCommit
Repository name: my-app-repo
Branch name: main
Detection option: CloudWatch Events (recommended) or AWS CodePipeline (polling)
Output artifacts: SourceArtifact
Build stage integration:
Build provider: AWS CodeBuild
Region: Same as pipeline
Project name: my-app-build (created earlier)
Input artifacts: SourceArtifact
Output artifacts: BuildArtifact
Deploy stage setup:
Deploy provider: AWS CodeDeploy
Region: Same as pipeline
Application name: my-app
Deployment group: production
Input artifacts: BuildArtifact
Click “Create pipeline” and the pipeline immediately executes.
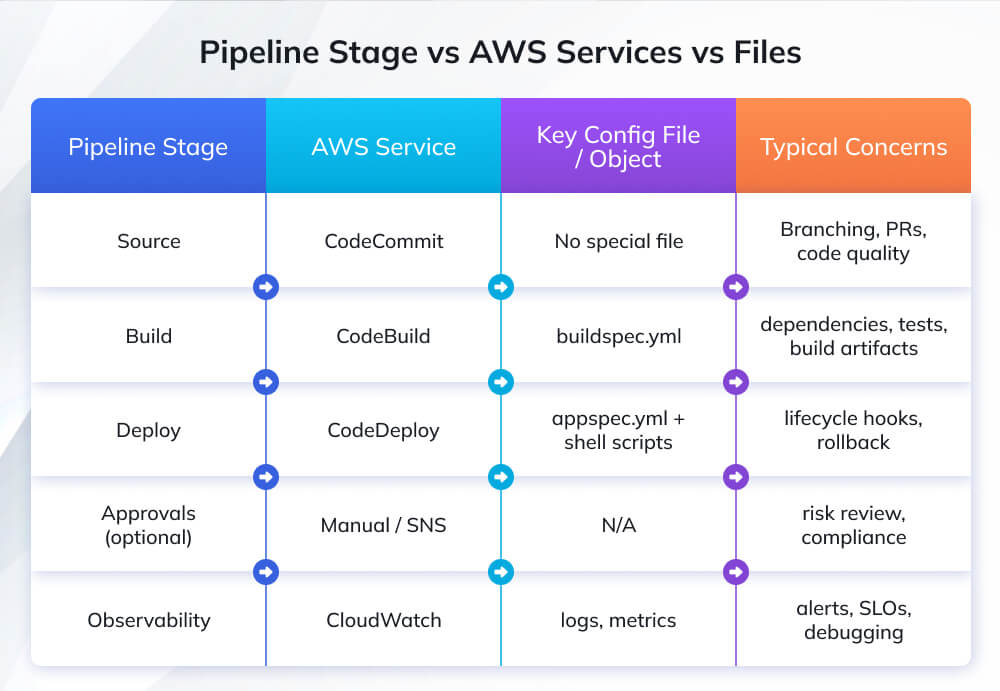
CloudFormation template for complete pipeline (infrastructure as code approach):
AWSTemplateFormatVersion: ‘2010-09-09’
Description: ‘Complete CI/CD Pipeline for sample application’
Parameters:
RepositoryName:
Type: String
Default: my-app-repo
BranchName:
Type: String
Default: main
Resources:
# S3 Bucket for artifacts
ArtifactBucket:
Type: AWS::S3::Bucket
Properties:
VersioningConfiguration:
Status: Enabled
BucketEncryption:
ServerSideEncryptionConfiguration:
– ServerSideEncryptionByDefault:
SSEAlgorithm: AES256
# CodePipeline
AppPipeline:
Type: AWS::CodePipeline::Pipeline
Properties:
Name: my-app-pipeline
RoleArn: !GetAtt CodePipelineServiceRole.Arn
ArtifactStore:
Type: S3
Location: !Ref ArtifactBucket
Stages:
# Source Stage
– Name: Source
Actions:
– Name: SourceAction
ActionTypeId:
Category: Source
Owner: AWS
Provider: CodeCommit
Version: ‘1’
Configuration:
RepositoryName: !Ref RepositoryName
BranchName: !Ref BranchName
PollForSourceChanges: false
OutputArtifacts:
– Name: SourceOutput
# Build Stage
– Name: Build
Actions:
– Name: BuildAction
ActionTypeId:
Category: Build
Owner: AWS
Provider: CodeBuild
Version: ‘1’
Configuration:
ProjectName: !Ref CodeBuildProject
InputArtifacts:
– Name: SourceOutput
OutputArtifacts:
– Name: BuildOutput
# Deploy Stage
– Name: Deploy
Actions:
– Name: DeployAction
ActionTypeId:
Category: Deploy
Owner: AWS
Provider: CodeDeploy
Version: ‘1’
Configuration:
ApplicationName: my-app
DeploymentGroupName: production
InputArtifacts:
– Name: BuildOutput
# IAM Roles (simplified – expand with least privilege policies)
CodePipelineServiceRole:
Type: AWS::IAM::Role
Properties:
AssumeRolePolicyDocument:
Version: ‘2012-10-17’
Statement:
– Effect: Allow
Principal:
Service: codepipeline.amazonaws.com
Action: sts:AssumeRole
ManagedPolicyArns:
– arn:aws:iam::aws:policy/AWSCodePipelineFullAccess
Adding Manual Approval Stage
Manual approval adds human gate before production deployment:
# Add between Build and Deploy stages in CloudFormation template
– Name: Approval
Actions:
– Name: ManualApproval
ActionTypeId:
Category: Approval
Owner: AWS
Provider: Manual
Version: ‘1’
Configuration:
NotificationArn: !Ref ApprovalSNSTopic
CustomData: ‘Please review build artifacts and approve production deployment’
ExternalEntityLink: !Sub ‘https://console.aws.amazon.com/codebuild/home?region=${AWS::Region}#/projects/${CodeBuildProject}/history’
SNS notification setup for approval notifications:
# Create SNS topic for approvals
aws sns create-topic –name pipeline-approvals
# Subscribe email to topic
aws sns subscribe \
–topic-arn arn:aws:sns:us-east-1:ACCOUNT-ID:pipeline-approvals \
–protocol email \
–notification-endpoint your.email@example.com
# Confirm subscription via email link
When pipeline reaches approval stage, designated approvers receive SNS email notification with link to approve or reject deployment.
Pipeline Execution and Monitoring
Triggering pipeline runs: Pipelines automatically trigger on source changes (if CloudWatch Events enabled):
# Manual pipeline execution
aws codepipeline start-pipeline-execution –name my-app-pipeline
# View pipeline state
aws codepipeline get-pipeline-state –name my-app-pipeline
Viewing execution history: CodePipeline Console shows:
Execution history with timestamps
Stage status (In Progress, Succeeded, Failed)
Action details and logs
Execution duration
Who triggered execution (Git commit author, manual trigger)
Stage-level monitoring: Click individual stages to view:
Action details and configuration
Input/output artifacts
CloudWatch logs links
Error messages (if failed)
Retry options
Advanced Configurations and Best Practices
Environment Variables and Secrets Management
AWS Systems Manager Parameter Store: Store non-sensitive configuration as parameters:
# Store parameter
aws ssm put-parameter \
–name /myapp/prod/api-url \
–value “https://api.example.com” \
–type String
# Reference in buildspec.yml
env:
parameter-store:
API_URL: /myapp/prod/api-url
AWS Secrets Manager integration: Store sensitive data (passwords, API keys):
# Create secret
aws secretsmanager create-secret \
–name myapp/db/credentials \
–secret-string ‘{“username”:”admin”,”password”:”MySecureP@ssw0rd”}’
# Reference in buildspec.yml
env:
secrets-manager:
DB_USERNAME: myapp/db/credentials:username
DB_PASSWORD: myapp/db/credentials:password
Environment-specific configurations: Maintain separate parameters/secrets for dev, staging, production using naming conventions (/myapp/{env}/config) and reference appropriate environment in pipeline.
Pipeline Optimization
Parallel execution stages: Run independent stages concurrently to reduce pipeline duration:
# Multiple actions in same stage execute in parallel
– Name: Test
Actions:
– Name: UnitTests
ActionTypeId:
Category: Test
Owner: AWS
Provider: CodeBuild
Configuration:
ProjectName: my-app-unit-tests
– Name: IntegrationTests
ActionTypeId:
Category: Test
Owner: AWS
Provider: CodeBuild
Configuration:
ProjectName: my-app-integration-tests
Caching strategies: Cache dependencies between builds to reduce build time and costs:
# In buildspec.yml
cache:
paths:
– ‘node_modules/**/*’ # NPM dependencies
– ‘.m2/**/*’ # Maven dependencies
– ‘.gradle/**/*’ # Gradle dependencies
First build downloads all dependencies (slow), subsequent builds retrieve from cache (fast—60-80% faster install phase).
Build time optimization:
Use smaller Docker base images (reduce pull time)
Implement layer caching for Docker builds
Run tests in parallel where possible
Skip unnecessary build steps for non-code changes (documentation-only commits)
Security Best Practices
Least privilege IAM policies: Grant minimum permissions required:
{
“Version”: “2012-10-17”,
“Statement”: [
{
“Effect”: “Allow”,
“Action”: [
“codecommit:GitPull”,
“codecommit:UploadArchive”
],
“Resource”: “arn:aws:codecommit:us-east-1:ACCOUNT-ID:my-app-repo”
}
]
}
Instead of AWSCodeCommitFullAccess (overly broad), create policies scoped to specific repositories and actions.
Encryption at rest and in transit: Enable encryption for S3 artifact buckets (AES-256 or KMS), CodeCommit repositories (automatic), and CodeBuild environment variables (automatic for Parameter Store/Secrets Manager).
Vulnerability scanning integration: Add security scanning to build stage:
# In buildspec.yml post_build phase
post_build:
commands:
# Dependency vulnerability scanning
– npm audit –audit-level=high
# Container image scanning (if using Docker)
– trivy image my-app: latest –severity HIGH, CRITICAL
Configure builds to fail if high/critical vulnerabilities are detected, preventing vulnerable code from deploying.
PRO TIP: PERFORMANCE OPTIMIZATION Enable caching in CodeBuild to reduce build times by 60-80% and cut costs proportionally. The first build after enabling caching will be slow (downloading all dependencies), but subsequent builds retrieve dependencies from the cache instead of downloading fresh. For a Node.js app with 200 dependencies, this reduces the install phase from 3 minutes to 30 seconds. Optimize cache configuration: Cache only immutable dependencies (node_modules, not source code), use cache hit/miss metrics to verify caching effectiveness, and periodically clear cache (weekly) to prevent stale dependency issues. In buildspec.yml cache section, specify paths precisely—don’t cache entire working directories or you’ll negate benefits and increase cache size/cost. |
Monitoring, Logging, and Troubleshooting
CloudWatch Integration
Pipeline metrics: CodePipeline automatically publishes metrics to CloudWatch:
PipelineExecutionSuccess / PipelineExecutionFailure counts
PipelineExecutionTime for performance tracking
StageExecutionTime identifies bottleneck stages
ActionExecutionTime for individual action performance
Create CloudWatch dashboards visualizing these metrics for pipeline health monitoring.
Log aggregation: All services write logs to CloudWatch Logs:
CodeBuild: /aws/codebuild/{project-name}
CodeDeploy: /aws/codedeploy/{application-name}
Lambda (if using): /aws/lambda/{function-name}
Query logs using CloudWatch Logs Insights for troubleshooting:
# Find all build failures in last 24 hours
fields @timestamp, @message
| filter @message like /ERROR/
| sort @timestamp desc
| limit 20
Alerting setup: Create CloudWatch Alarms for critical events:
# Alert on pipeline failures
aws cloudwatch put-metric-alarm \
–alarm-name pipeline-failure-alert \
–alarm-description “Alert when pipeline fails” \
–metric-name PipelineExecutionFailure \
–namespace AWS/CodePipeline \
–statistic Sum \
–period 300 \
–evaluation-periods 1 \
–threshold 1 \
–comparison-operator GreaterThanOrEqualToThreshold \
–alarm-actions arn:aws:sns:us-east-1:ACCOUNT-ID:devops-alerts
Common Issues and Solutions
Build failures:
Symptom: CodeBuild reports FAILED status
Common causes: Dependency installation errors, test failures, buildspec.yml syntax errors, insufficient permissions
Solution: Review CloudWatch Logs for build, identify failing command, fix locally and test, commit fix
Deployment errors:
Symptom: CodeDeploy reports FAILED status
Common causes: CodeDeploy agent not running, appspec.yml script errors, insufficient disk space, validation hook failures
Solution: SSH to EC2 instance, check CodeDeploy agent status (sudo service codedeploy-agent status), review deployment logs (/var/log/aws/codedeploy-agent/), manually test deployment scripts
Permission issues:
Symptom: AccessDenied errors in logs
Common causes: Missing IAM permissions, incorrect service role ARN, cross-account permission gaps
Solution: Review IAM role policies, add missing permissions, verify role trust relationships, test with IAM Policy Simulator
Debugging Strategies
CloudWatch Logs analysis: Enable verbose logging in buildspec.yml for detailed output:
phases:
build:
commands:
– set -x # Enable bash debug mode (prints each command)
– npm run build 2>&1 | tee build.log # Capture output
CodeBuild debug sessions: For complex build issues, use the CodeBuild session manager to interactively debug:
# Start build with session manager enabled
aws codebuild start-build \
–project-name my-app-build \
–session-enabled \
–debug-session-enabled
# Connect to build container (requires Session Manager plugin)
aws codebuild start-build-batch \
–project-name my-app-build
# SSH into build environment
aws codebuild start-session –build-id
CodeDeploy troubleshooting: Most deployment issues relate to scripts or permissions:
# View deployment logs on EC2 instance
sudo tail -f /var/log/aws/codedeploy-agent/codedeploy-agent.log
# Check deployment directory
ls -la /opt/codedeploy-agent/deployment-root/
# Manually test deployment scripts
cd /home/ec2-user/my-app/scripts
bash -x start_server.sh # Run with debug output
Conclusion
A well-designed CI/CD pipeline on AWS transforms deployments from fragile, manual processes into a repeatable, automated system that delivers reliable changes quickly. Using CodeCommit, CodeBuild, CodeDeploy, and CodePipeline together gives you a fully managed, cloud-native delivery flow that scales with your applications and teams.
Start by implementing a basic pipeline for a single service, get it stable, then extend it with blue/green deployments, automated tests, security scans, and promotion across dev–staging, prod. As your maturity grows, standardize these patterns across all critical applications so every change follows the same proven path to production.
If you want to go beyond “following tutorials” and actually design robust AWS delivery pipelines end-to-end, consider Invensis Learning’s AWS DevOps Certification training. It helps you align AWS tooling with DevOps principles, so your CI/CD pipeline becomes a core business capability rather than a one-off setup.
Frequently Asked Questions
1. Do I need to use all AWS native services, or can I integrate third-party tools?
AWS CodePipeline integrates seamlessly with third-party tools, enabling incremental adoption. Common hybrid patterns: use GitHub/GitLab for source control (developers prefer existing workflows) but CodeBuild/CodeDeploy for AWS-specific build and deployment tasks; use Jenkins for builds (leveraging existing Jenkins expertise and plugins) but CodeDeploy for AWS deployments; or use AWS native services for new projects while maintaining existing Jenkins/GitLab CI pipelines for legacy applications. CodePipeline’s integration flexibility lets you start where you are and migrate gradually rather than forcing a complete replacement.
2. How much does running a CI/CD pipeline on AWS cost?
Costs depend on usage volume but are generally modest for small-to-medium teams: CodePipeline: $1/active pipeline/month (first pipeline free); CodeBuild: ~$0.005/minute for small compute ($0.30/hour), typical build taking 5 minutes costs $0.025;
CodeDeploy: Free for EC2/on-premise deployments, $0.02 per on-demand code deployment for Lambda/ECS; CodeCommit: $1/active user/month (5 users free), $0.06/GB-month storage; S3 artifact storage: $0.023/GB-month. Example cost for a small team (5 developers, 100 builds/month, 50 deployments/month): ~$5-15/month total, much cheaper than managing Jenkins servers (~$200-500/month for EC2 instances and maintenance).
3. How do I implement CI/CD for Lambda functions or containers instead of EC2?
For Lambda: Use CodeBuild to package Lambda code (zip or container image), use CodeDeploy with da eployment configuration supporting Lambda (traffic shifting, canary deployments), and update the Lambda function in deploy stage.
For containers (ECS/EKS): Use CodeBuild to build Docker images (docker build, push to ECR), use CodeDeploy for ECS services (supports blue/green deployments with automatic traffic shifting), or use kubectl/Helm commands in CodeBuild for Kubernetes deployments. CodePipeline supports all compute platforms, adjusts build and deploy stages based on target platform while maintaining same overall pipeline structure.
4. How do I set up separate pipelines for dev, staging, and production environments?
Option 1 – Separate pipelines: Create distinct pipelines per environment (dev-pipeline, staging-pipeline, prod-pipeline) triggered by different branches (develop → dev-pipeline, main → prod-pipeline). Provides isolation but duplicates configuration.
Option 2 – Multi-stage single pipeline: (recommended): Create one pipeline with stages for each environment: Source → Build → Deploy-to-Dev → Manual-Approval → Deploy-to-Staging → Manual-Approval → Deploy-to-Production. Each deploy stage uses different CodeDeploy deployment groups targeting different EC2 instances/environments. Use environment-specific parameters from Parameter Store (e.g., /myapp/dev/db-url, /myapp/prod/db-url) referenced in deployment configurations.
5. What happens if a deployment fails halfway through? How do I rollback?
CodeDeploy automatically handles rollback if deployment fails during execution: if the ValidateService hook fails or instances become unhealthy during deployment, CodeDeploy marks the deployment as FAILED and can automatically rollback to previous version (if AutoRollbackConfiguration enabled). For deployments that succeed but later prove problematic: use CodeDeploy Console “Redeploy previous revision” to instantly deploy previous working version, or trigger pipeline with the previous Git commit SHA.
Best practice: Enable automatic rollback in CodeDeploy deployment groups, implement comprehensive ValidateService hooks catching issues during deployment rather than after, and maintain deployment history enabling easy identification of the last known good version.
6. How do I run integration tests or database migrations as part of the pipeline?
Integration tests: Add Test stage between the Build and Deploy stages using CodeBuild project that runs integration tests against deployed staging environment. Configure the test project to pull artifacts from Build stage, deploy to the temporary test environment, execute integration tests, report results (pass/fail), and tear down the test environment.
Database migrations: Include migration scripts in the deployment package. Add migration execution to appspec.yml in the BeforeInstall or AfterInstall hooks (runs on one instance using a mutex/lock to prevent concurrent execution). Verify migrations succeeded in the ValidateService hook before proceeding. For zero-downtime requirements, use backward-compatible migrations (add columns, deploy code, remove old columns later) supporting old and new code versions simultaneously.
7. Can I use CodePipeline to deploy infrastructure changes (Infrastructure as Code)?
Yes, CodePipeline commonly deploys infrastructure using CloudFormation, Terraform, or CDK:
CloudFormation approach: Add Deploy stage with CloudFormation action type, specify template file from source stage, use parameter overrides for environment-specific values, and CloudFormation creates/updates stack.
Terraform approach: Use CodeBuild project executing Terraform commands (terraform plan, terraform apply), store Terraform state in S3 backend with DynamoDB locking, use separate pipeline stages for plan (review changes) and apply (execute changes).
Best practice: Separate infrastructure pipelines from application pipelines unless tightly coupled, use manual approval before infrastructure changes in production (infrastructure changes higher risk than application deployments), and implement drift detection monitoring infrastructure state versus code.